RustでCenterFaceのONNXモデルを動かして、それをWebAssemblyで動くようにして、最終的にproxy-wasmで動くようにする、というのをGWにやったので書いておきます。
全部で3記事の予定で、この記事ではCenterFaceのONNXモデルをRustで動かしたことについて書きます。
リポジトリはこちらになります。
リポジトリの src/center_face.rs がCenterFaceを動かすコアの部分で、
src/detect.rs が顔検出のONNXモデルで顔を検出して、ボックスとランドマークを追加した画像を吐くプログラムです。
ONNXはtractで動かしました。
GitHub - sonos/tract: Tiny, no-nonsense, self-contained, Tensorflow and ONNX inference
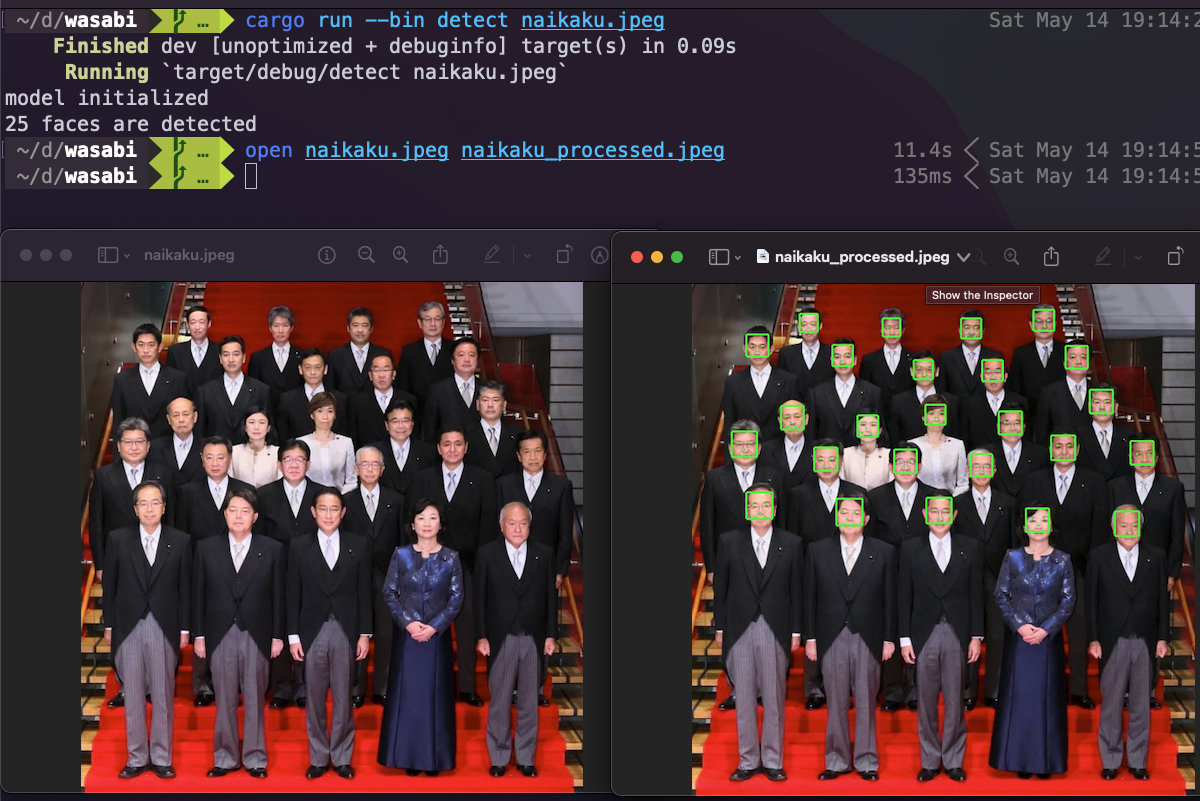
このプログラムをcargoで動かすときは、以下のようにします。 引数として、対象の画像ファイルのファイルパスを指定します。 オプション引数として、検出の際に画像を縮小する度合いを指定します。指定しなければ縮小されません。
image.jpg を渡すと、image_processed.jpg が出力されます。画像サイズは入力と同じです。
cargo run --package wasabi --bin detect image.jpg 2
CenterFaceとは?
CenterFace(size of 7.3MB) is a practical anchor-free face detection and alignment method for edge devices.
ディープラーニングは何もわからないので詳しくはわからないですが、顔のボックスとランドマークを高精度で検出できる顔検出器らしいです。
ONNXのモデルが提供されているので、これを使えば簡単に顔検出を実装できます。
モデルを動かすためには入力と出力の形式を知っておく必要があります。 NetronでこのONNXモデルを見てみると以下のようになっています。
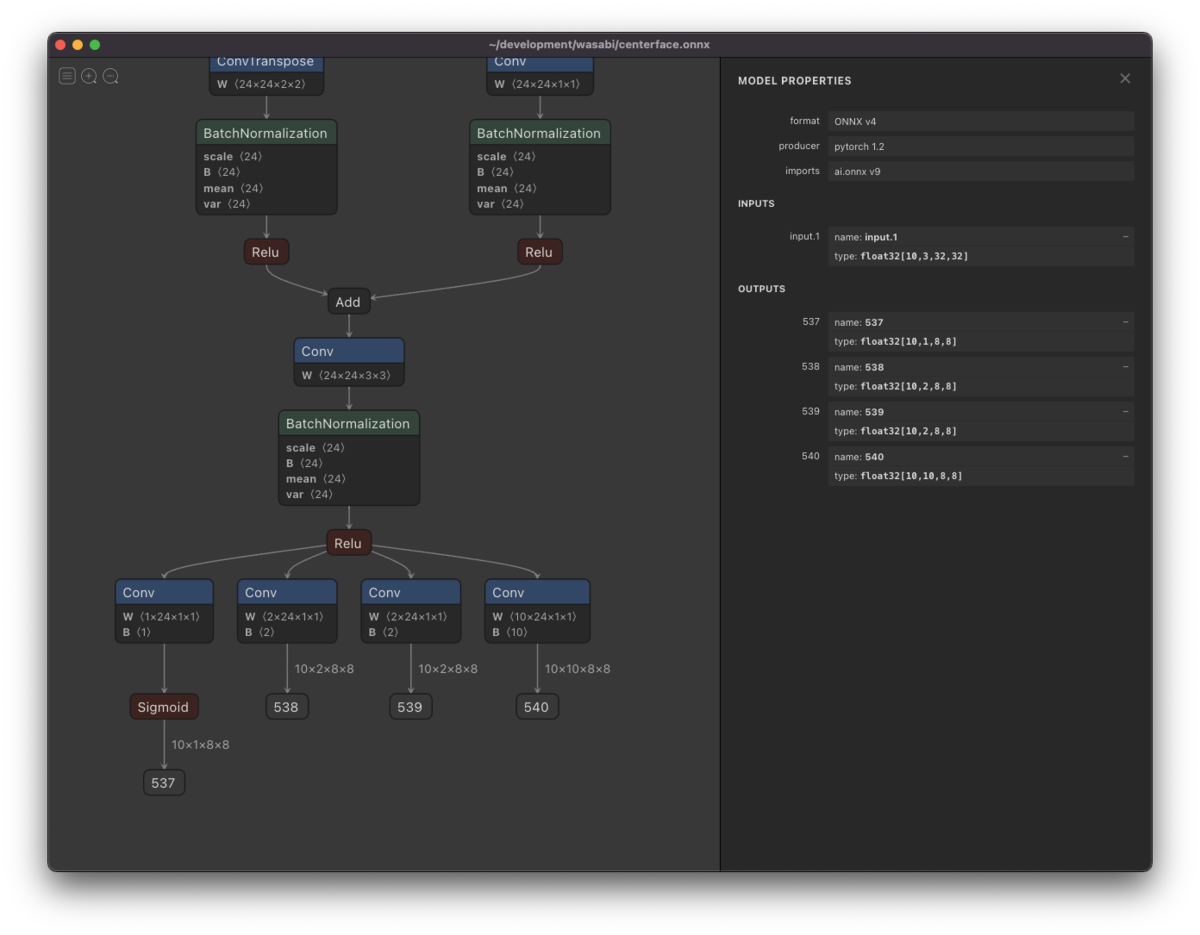
inputsの形式が [10, 3, 32, 32] で、outputs の形式が (537) [10, 1, 8, 8], (538) [10, 2, 8, 8], (539) [10, 2, 8, 8], (540) [10, 10, 8, 8] となっています。
CenterFaceのPython実装を見ても分かるとおり、実際に入力しているデータの形式は [10, 3, 32, 32] ではないです。
入力データの形式を [batch_size, rgb, height, width] とすると、
batch_size は任意の数で良く、rgb は3で固定です。
height と width は 32の整数倍であれば良いです。
ただし、height, width が大きいと、当然ながら推論に時間がかかります。
この形式の入力データのとき、出力データの形式は [batch_size, *, height / 4, width / 4] となります。
* は 1, 2, 2, 10で固定です。
CenterFaceのRust実装
CenterFace が顔検出を行うものです。
wasabi/center_face.rs at master · hayashikun/wasabi · GitHub
pub struct CenterFace {
    width: u32,
    height: u32,
    model: RunnableModel<TypedFact, Box<dyn TypedOp>, Graph<TypedFact, Box<dyn TypedOp>>>,
}
CenterFace::new では、ONNXモデルを読み込んで tract_onnx の RunnableModel を用意しています。
impl CenterFace {
    pub fn new(width: u32, height: u32) -> TractResult<CenterFace> {
        let ws = (width / 32) as i32;
        let hs = (height / 32) as i32;
        let onnx_model = include_bytes!("../centerface.onnx");
        let model = onnx().model_for_read(&mut BufReader::new(&onnx_model[..]))?
            .with_input_fact(0, InferenceFact::dt_shape(f32::datum_type(), tvec![1, 3, height as i32, width as i32]))?
            .with_output_fact(0, InferenceFact::dt_shape(f32::datum_type(), tvec![1, 1, 8 * hs, 8 * ws]))?
            .with_output_fact(1, InferenceFact::dt_shape(f32::datum_type(), tvec![1, 2, 8 * hs, 8 * ws]))?
            .with_output_fact(2, InferenceFact::dt_shape(f32::datum_type(), tvec![1, 2, 8 * hs, 8 * ws]))?
            .with_output_fact(3, InferenceFact::dt_shape(f32::datum_type(), tvec![1, 10, 8 * hs, 8 * ws]))?
            .into_optimized()?
            .into_runnable()?;

        Ok(CenterFace { width, height, model })
    }
}
include_bytes! を使えばコンパイル時にonnxを読み込むことができるので、バイナリに埋め込めます。
実行時にonnxを読む場合は、
onnx().model_for_path("path/to/centerface.onnx")?
とすれば実行時に読み込めます。
今回このリポジトリには centerface.onnx を含めていないので、README.md に書いてある通りダウンロードしておかないとビルドが失敗します。
モデルを読み込んだら、with_input_fact で入力の形式を、with_output_fact で出力の形式を与えます。
この時点で RunnableModel に渡せるデータの形式が決まります。
detectに画像のデータの tract_data::Tensor を渡すと、検出された顔の情報を取得できます。
impl CenterFace {
    pub fn detect(&self, image: Tensor) -> TractResult<Vec<Face>> {
        // image: (1, 3, height, width)

        let result = self.model.run(tvec!(image))?;

        let heatmap = result.get(0).unwrap().to_array_view::<f32>()?;
        let scale = result.get(1).unwrap().to_array_view::<f32>()?;
        let offset = result.get(2).unwrap().to_array_view::<f32>()?;
        let landmark = result.get(3).unwrap().to_array_view::<f32>()?;

        let faces = self.decode(heatmap, scale, offset, landmark)?;

        Ok(faces)
    }
}
このモデルでは、直接顔のボックスを取得できるわけではないので、heatmapなどの情報からボックスや顔パーツの位置を求めます。
その処理を行うのが CenterFace.decode で、Vec<Face>が得られます。
ここでは CenterFace.decode については省略します。
#[derive(Debug, Clone, Serialize, Deserialize)]
pub struct Face {
    pub x1: u32,
    pub y1: u32,
    pub x2: u32,
    pub y2: u32,
    pub score: f32,
    pub landmarks: Vec<(u32, u32)>,
}
画像処理のRust実装
今回、画像処理はimage-rs/imageを使用しました。
GitHub - image-rs/image: Encoding and decoding images in Rust
引数で指定された画像を読み込み、CenterFace を初期化する処理は detect.rs の main に、以下のように記述しています。
let args: Vec<String> = env::args().collect();
if args.len() < 2 {
    return;
}
let file = args[1].clone();
let mut image = image::open(&file).unwrap().to_rgb8();

let scale = if args.len() > 2 {
    args[2].clone().parse().unwrap_or(1)
} else {
    1
};
let wf = image.width() / 32 / scale;
let hf = image.height() / 32 / scale;
let cf = CenterFace::new(32 * wf, 32 * hf).unwrap();

let faces = cf.detect_with_resize(&image).unwrap();
scaleは第二引数で指定することができ、scale=1のときCenterFace::new に渡される縦横のサイズは、32の倍数で画像のサイズ以下の値になります。
モデルに大きい画像を入れると実行は遅くなります。
顔が判別できる程度の画像サイズであれば良いので、適当に縮小した方が良いです。
あとは、CenterFace.detect_with_resize に画像を渡せば検出できます。
impl CenterFace {
    #[cfg(feature = "image")]
    pub fn detect_with_resize(&self, image: &RgbImage) -> TractResult<Vec<Face>> {
        let org_width = image.width();
        let org_height = image.height();

        let image = imageops::resize(
            image, self.width, self.height, imageops::FilterType::Triangle,
        );

        let mut faces = self.detect_image(&image)?;

        for i in 0..faces.len() {
            faces[i].x1 = faces[i].x1 * org_width / self.width;
            faces[i].x2 = faces[i].x2 * org_width / self.width;
            faces[i].y1 = faces[i].y1 * org_height / self.height;
            faces[i].y2 = faces[i].y2 * org_height / self.height;

            for j in 0..5 {
                faces[i].landmarks[j].0 = faces[i].landmarks[j].0 * org_width / self.width;
                faces[i].landmarks[j].1 = faces[i].landmarks[j].1 * org_height / self.height;
            }
        }

        Ok(faces)
    }

    #[cfg(feature = "image")]
    pub fn detect_image(&self, image: &RgbImage) -> TractResult<Vec<Face>> {
        let image: Tensor = Array4::from_shape_fn(
            (1, 3, self.height as usize, self.width as usize),
            |(_, c, y, x)| {
                image[(x as _, y as _)][c] as f32
            },
        ).into();

        let faces = self.detect(image)?;

        Ok(faces)
    }
}
detect_image では、画像をTensorに変換してdetectに渡しています。
detect_image に与えられる画像のサイズは CenterFace::new で指定したサイズです。
detect_with_resizeには任意のサイズの画像を与えることができて、detect_imageを呼ぶ前後で画像サイズと結果の座標値の変換を行なっています。
detect_image と detect_with_resize について、#[cfg(feature = "image")] としているのは、画像処理は後に行うwasmに含めたくないからです。
この辺りは追って解説します。
詳細は省略しますが、得られたVec<Face>を使って、画像の顔の部分に緑の枠と点を描き、画像を保存しています。
wasabi/detect.rs at master · hayashikun/wasabi · GitHub
Build & Run
CenterFace自体は後のwasmでも使用したいのでlibとしていて、Cargo.tomlには以下のようになっています。
[package]
name = "wasabi"
version = "0.1.0"
edition = "2021"

[lib]
crate-type = ["cdylib", "rlib"]

[dependencies]
image = "0.24.1"
tract-onnx = "0.16.5"
serde = { version = "1.0", features = ["derive"] }
serde_json = "1.0"

[[bin]]
name = "detect"
path = "src/detect.rs"

[features]
default = ["image"]
image = []
冒頭にも書きましたが、 cargoで実行するときは以下のようにします。
cargo run --package wasabi --bin detect image.jpg 2
Release buildは、以下のようにします。
cargo build --package wasabi --bin detect --release
onnxモデルを埋め込んでいるからか、それなりにバイナリは大きくなり、手元でビルドしてみると 23.4 MB でした。 onnxモデル自体は7.5 MBです。
以上!